Fear not, you don't need to remove the front bumper to change the bulb either!

This post may contain affiliate links. Please read my disclosure for more info.
Time to Complete - 5 minutes
Difficulty - 1/5
Tools and Parts Required
- Plastic trim removal tool set
Flat head screw driver and cloth(see Step 1)- Replacement indicator housing (if required)
- Replacement offset 581 PY21W bulbs
Disclaimer: Any information given in this guide is to be used at the readers own risk. I take no responsibility for injuries to the reader or damage to their vehicles. If this guide is followed correctly, no harm should occur to either the reader or the car.
Please read through the entirety of this guide prior to undertaking any work, and take due care.
How to Remove and Refit Rover 25 and MG ZR Front Bumper Indicators
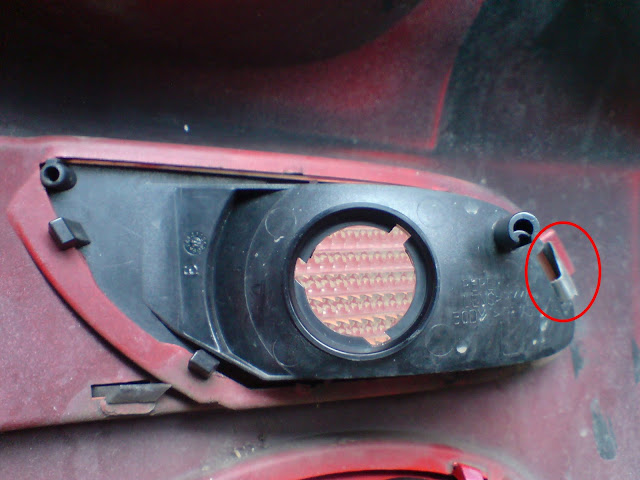
Step 1 - Locate and Release the Indicator Retaining Clip
UPDATE!Originally, being a naive youth, I used a metal flat head screw driver, I was careful and luckily I didn't damage the paint. However, I'd highly recommend at least wrapping a cloth around a flat head screwdriver (as per Dr.Buck's tip in the comments below) to avoid damaging your paint.
Ideally though, get yourself a set of plastic trim removal tools, use the thinnest and narrowest one you've got. This should minimise any damage you could do to your pride and joy's paint.
I've got this Neilsen set from Amazon, it's definitely worth the money, there aren't many jobs I do on my cars without using them at least once.

Using your


Step 2 - Keep the Clip Compressed and Pivot the Indicator Out of the Bumper
Once the clip has been compressed lever the indicator housing forward, pivoting about the outside edge.Guide the housing out whilst keeping the clip compressed, don't allow the clip to spring back and scratch your paint as you lever the indicator away from the front bumper.
It should just pop out once the clip is clear of the bumper skin.

Step 3 - Remove the Indicator Bulb Holder
Once the indicator housing has been removed from the front bumper, you then have access to the bulb holder.To remove the bulb holder from the indicator housing just twist it and pull it out.

Step 4 - Replacing the Indicator Bulb (Detango)
When you've removed the bulb holder from the main indicator housing, this is how it'll look. To remove the bulb, simply apply a tiny bit of pressure on the bulb, pushing toward the holder, then twist anticlockwise.
The mk1 Rover 25 and MG ZR front indicator bulbs are offset 581 (PY21W) type bulbs (not 382's, the connector pin offsets are different).
If you just want to fit an orange replacement bulb, I'd recommend Osram Originals, you can grab a pair on Amazon by clicking the previous link or image below.

Alternatively, you could detango your Rover 25 or MG ZR front end by fitting chrome / silver indicator bulbs. It's what I did and personally I think it looks miles better.
These chrome Osram bulbs should do the trick!

Here's the before and after shots of detango'ing my Rover 25.
Original orange indicator bulb

Chrome indicator bulb


Step 5 - Refitting
Refitting the bulb and the indicator is just a case of following step 1 - 4 in reverse.Job Done!
Only thing left to do is grab your keys and go for a drive!Let me know in the comments below how you get on, and be sure to check out my other service and how to guides to keep your MG Rover running and looking sweet.

6 Comments
A tip; to prevent tools from damaging the paintwork on the bumper, wrap it in a thin tea-towel (or similar) first.
ReplyDeleteExcellent tip Dr.Buck!
ReplyDeleteGreat instructions! I lost the clip however (clumsy!) and I want to ask if you know where I can buy clips online? I have searched but so far in vain.
ReplyDeleteGreat instructions! I lost the clip however (clumsy!) and I want to ask if you know where I can buy clips online? I have searched but so far in vain.
ReplyDeleteHi Elinor,
DeleteThanks! Glad you found the article useful.
I don't know for sure, but if anyone does sell them I would imagine Rimmer Bros would be your best shot, be worth dropping them an email.
Failing that, it might be easier to just buy a new light on eBay, they are pretty cheap these days, even for a brand new genuine Rover one.
Hope this helps,
Best regards,
Andy.
Thank you very much for your reply. I have tried Rimmer Bros and they don't sell the springs separately. It seems I have to buy a new light, I see now thanks to your comment that they come at a reasonable price.
ReplyDeleteBest regards,
Elinor
Post a Comment
Let me know what you think by leaving a comment below.