Ideal for the DIY mechanic who likes to service their car, or when upgrading to drilled or grooved discs.

This post may contain affiliate links. Please read my disclosure for more info.
Time to Complete - 30-60 minutes
Difficulty - 3/5
Tools and Parts Required
- New front brake discs
- 17mm Socket
- Ratchet
- Torque Wrench
- Phillips head screw driver
- Phillips head socket bit
- G clamp or Piston wind back tool
- Wire/String
- Wheel chocks
- Jack
- Axle stands
- Tool to remove road-wheel nuts (locking wheel nut tool etc)
Disclaimer: Any information given in this guide is to be used at the readers own risk. I take no responsibility for injuries to the reader or damage to their vehicles. If this guide is followed correctly, no harm should occur to either the reader or the car.
Please read through the entirety of this guide prior to undertaking any work, and take due care.
How to Replace Rover 25 / MG ZR Front Brake Discs
Note: This guide was made whilst I was fitting new pads. It is not necessary to have the caliper in the condition that it is in during this guide, i.e. with the caliper open and pads removed. The discs can be replaced with the pads fitted and the caliper closed.
If your discs have large lips around the edges, then it will be best if you fit new pads as well as discs. To do this please follow my guide to replacing the front brake pads, switching back to this guide when instructed.
You should also replace discs in axle sets, not individually. i.e. replace both front discs, not just one.
Step 1
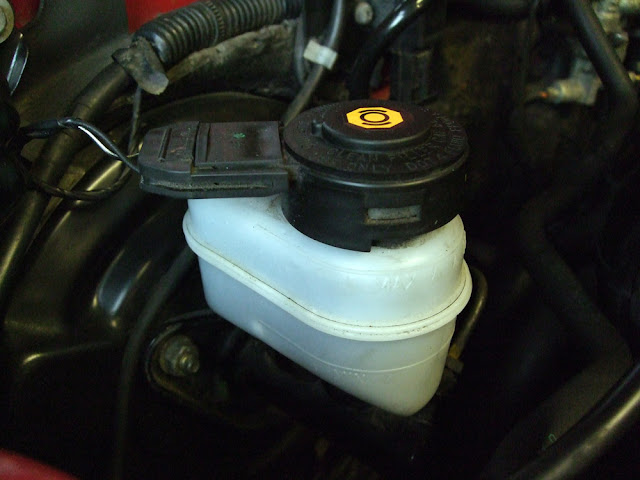
Locate the brake fluid master cylinder reservoir in the engine bay, it should be in the top left of the engine bay as you look at it.
Remove the electrical connector by pulling it away from the cap.

The cap should now be able to be turned anticlockwise around 45°, it will then lift out.

Remove the cap and place it somewhere safe. Now wrap a rag/cloth around the cylinder so that in the event of an overflow of fluid it should be caught.


Step 2
Chock behind the back wheels and make sure the handbrake is fully engaged. Slacken the nuts on both front wheels, then jack the front end up and support with axle stands.

Step 3
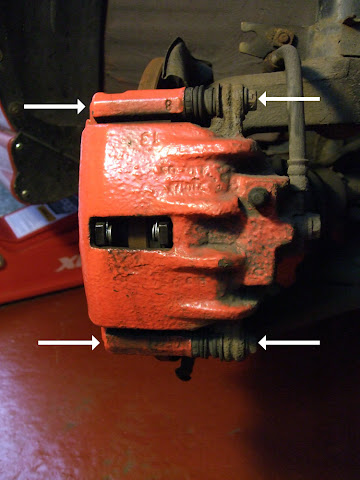
With the wheel removed turn the steering wheel toward the direction of the corner you are working on. For example, if you're working on the drivers side, turn the steering wheel right (clockwise). This will give you a better view of the job and easier access with tools.If you're removing the caliper without removing the pads, i.e. just replacing the discs, then you will need to check to see if there is a lip on the discs. If there is a considerable lip on the discs, similar to how mine were in my 67000/68000 mile service, then you will need to compress the caliper to allow the pads to move over the lip in the disc.
To do this, take a G Clamp and compress it at the points indicated in the picture below. Whilst doing this keep an eye on the brake fluid master cylinder reservoir checking that it isn't overflowing.

When the caliper has been compressed as above, or if the brake pads have been removed as per my front brake pad replacement guide, carry on with the rest of this step.
Locate and remove the two bolts holding the caliper to the hub. Do this using a 17mm socket and ratchet, these bolts will be very tight.


Step 4
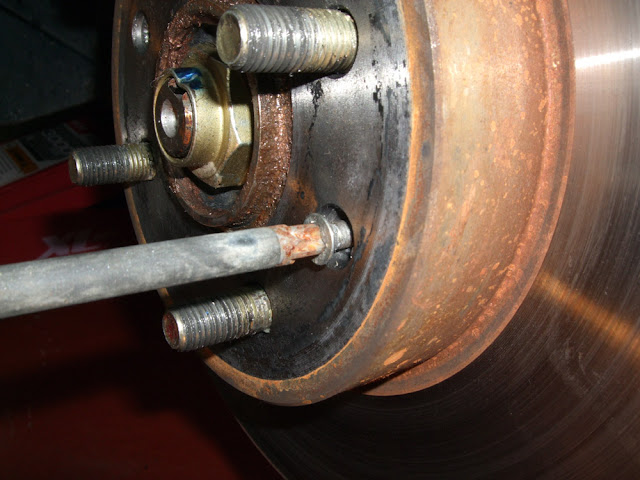
When the above bolts are removed, support the caliper as it will be free of the hub and only connected via the brake hose, do NOT allow the caliper to hang from the brake hose. Whilst supporting the caliper, tie it up out of the way of the brake disc, the suspension spring is a good tie point.

Step 5
It will now be easier to return the position of the wheels (if they were fitted) back to being straight. The disc should now be clear of the brake calipers and ready to be removed. To remove the brake disc, take a large Phillips head screw driver and unscrew the two screws holding it to the hub.


Step 6
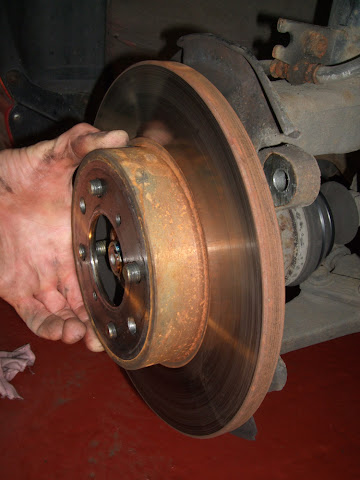
The disc should now be free of the hub, and able to be pulled off. If the disc won't budge, there are two threaded bolt holes (not the ones where the screws came out of) that can have a bolt screwed into them to force the disc off the hub.

Step 7
To refit, reposition the discs back onto the hub taking note to get them in the right orientation so that the screw holes align with those in the disc. Replace the screws using a Phillips head socket bit and a torque wrench, as the screws must be tightened to the specific torque of: 5Nm / 4ft lb.Step 8
It will be easier to refit the caliper with the steering wheel at full lock towards the side you are working, the same as in step 3.Untie and replace the caliper over the discs. Replace the two bolts that hold the caliper to the hub. Tighten them using the 17mm socket and a torque wrench, as they need to be tightened to the specific torque of: 108Nm / 80ft lb.
At this point if you are replacing the pads as well, you can return back to my front brake pad replacement guide at step 6, without following any more of this guide.
If you are not replacing the pads, then continue with step 9 of this guide.
Step 9
Once both sides have been completed, replace the cap to the brake fluid master cylinder reservoir by doing the reverse of step 1. Then pump the foot brake to make sure that the pads are seated correctly on the disc, so that the normal unassisted pressure has been restored.Once the pads are seated correctly, replace the road-wheels and remove the axle stands. Finally, carefully lower the car back down to the ground and remove the chocks behind the rear road-wheels.

1 Comments
Replacing the front brake discs on a Rover 25 / MG ZR is a pretty straightforward job for anyone who enjoys DIY maintenance. It’s also a good opportunity to upgrade to drilled or grooved discs if you want better cooling and braking performance. Just make sure you’ve got the right tools and torque settings before starting.
ReplyDeleteIf you're in Dubai and need professional help or parts support, this car repair shop is a solid option.
Post a Comment
Let me know what you think by leaving a comment below.