Follow this step by step guide to removing and replacing the exhaust backbox on your MG ZR / Rover 25.

This post may contain affiliate links. Please read my disclosure for more info.
Time to Complete - 30 minutes
Difficulty - 3/5
Tools and Parts Required
- Jack
- Wheel chocks
- 17mm Spanner (x2)
- Replacement Gaskets
- Penetrating Oil
- Replacement Backbox (optional)
- Washing Up Liquid (optional)
Disclaimer: Any information given in this guide is to be used at the readers own risk. I take no responsibility for injuries to the reader or damage to their vehicles. If this guide is followed correctly, no harm should occur to either the reader or the car.
Please read through the entirety of this guide prior to undertaking any work, and take due care.
How to remove and refit a Rover 25 and MG ZR Exhaust Backbox
Step 1 - Jack up the Car
The first thing you will need to do is get the car off the ground giving enough access to the backbox. You might have access to a hydraulic lift, but for the majority of us we don't. So chock the front wheels (put a block of wood in front of the front wheels) and start jacking up the rear of the car. The car should also be in reverse gear.Step 2 - Spray Bolts with Penetrating Oil
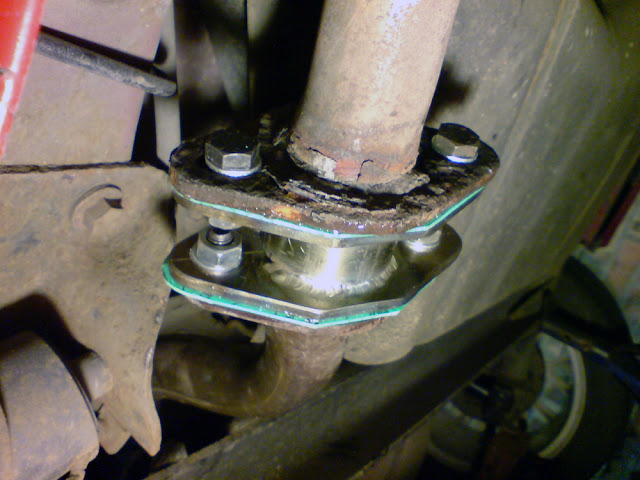
Once suitably elevated locate the join between the backbox and intermediate pipe, starting from the back of the car this is the first set of flanges you come to. In the image below you can see the join in my car, please note however that I have an exhaust extension, you will only have one set of flanges not two. If the backbox has never been removed, or at least not in a long time, it'd be worth spraying a bit of Penetrating Oil on the bolts prior to trying to undo them.
Step 3 - Undo Bolts
Using the two 17mm spanners (in opposite rotations) undo the two bolts holding the gaskets together.
Step 4 - Unhook Exhaust from Rubber Hangers
The backbox should now be free of the other sections of the exhaust. The only thing holding it on now are the two rubber bushes at the box end of the backbox and one half way along the piping. To get the backbox free of these simply push the rods out of them. The backbox should now be completely free of the car.
Step 5 - Remove Exhaust
Getting the backbox away from the car requires a bit of angling and tilting to get it passed the rear axle, but should be fairly easy. When removed the backbox should look similar to either of these, the top being the original rover backbox and the bottom being a custom Longlife stainless steel oval tip backbox.

1 Comments
Thanks, This blogs is very helpful for us, how to remove and refit a Rover exhaust backbox.
ReplyDeleteExhaust Back Box
Post a Comment
Let me know what you think by leaving a comment below.