Ideal for the DIY mechanic who likes to service their pride and joy, or when upgrading to performance brake pads such as EBC yellow stuff.

This post may contain affiliate links. Please read my disclosure for more info.
Time to Complete - 30-45 minutes
Difficulty - 3/5
Tools and Parts Required
- New front brake pads (with shims, springs)
- 12mm Socket
- Ratchet
- Torque Wrench
- G clamp or Piston wind back tool
- Wire/String
- Wheel chocks
- Jack
- Axle stands
- Tool to remove road-wheel nuts (locking wheel nut tool etc)
Disclaimer: Any information given in this guide is to be used at the readers own risk. I take no responsibility for injuries to the reader or damage to their vehicles. If this guide is followed correctly, no harm should occur to either the reader or the car.
Please read through the entirety of this guide prior to undertaking any work, and take due care.
How to Remove and Refit Rover 25 / MG ZR Front Brake Pads
Note: Brake pads should be replaced in axle sets, not singularly i.e. both sets of front brake pads, 4 pads in total.
Step 1
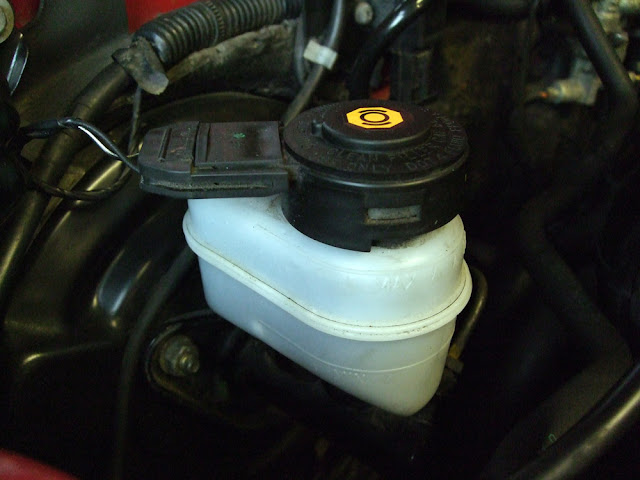
Locate the brake fluid master cylinder reservoir in the engine bay, it should be in the top left of the engine bay as you look at it.
Remove the electrical connector by pulling it away from the cap.

The cap should now be able to be turned anticlockwise around 45°, it will then lift out.

Remove the cap and place it somewhere safe. Now wrap a rag/cloth around the cylinder so that in the event of an overflow of fluid it should be caught.


Step 2
Chock behind the back wheels and make sure the handbrake is fully engaged. Slacken the nuts on both front wheels, then jack the front end up and support with axle stands.

Step 3
When changing the brake pads you will want to turn the steering wheel towards the corner you're working on. For example, if you're working on the drivers side, turn the steering wheel right (clockwise). This will give you a better view of the job and easier access with tools.Taking the 12mm socket and a ratchet, locate and undo the highlighted bolt.


Step 4
With this bolt removed, the top of the caliper should now pivot 180° upwards revealing the brake pads. It should stay when fully opened, but just to be safe it is good practice to tie it to the suspension spring with some string or wire.
Step 5
You can now remove the shim at the top covering the piston. It is also now possible to remove the brake pads, they simply pull out.


Note: If you are replacing your front brake discs at the same time as the pads, then at this point that you will want to head over to my front brake disc replacement guide.
If you are just replacing the pads, then please continue with step 6.
Step 6
Fit the supplied shims and springs to the replacement pads, then slot the pads back into the caliper. They are a little tricky to get it, requiring a bit of jiggling about but they do just push in. Once in the brakes should once again look like this.
Step 7
The new pads will be thicker than the old ones, so you will need to push the piston back to allow the top of the caliper to fit over them.To do this use the g clamp, or piston wind back tool if you have one, to slowly push the piston back far enough back that the top of the caliper will fit over the pads.
Whilst doing this, keep an eye on the brake fluid master cylinder reservoir, checking for any overflows of fluid. If the fluid is above the MAX level when the piston is moved back, enough to accommodate the new pads, then remove the excess fluid.
Step 8
Replace the piston shim, and carefully lower the top of the caliper into position, keeping hold of the piston shim for as long as possible so it doesn't slip out of position.
Step 9
Once the top caliper is seated back in position, replace the bolt and tighten it up using the torque wrench. The bolt needs to be tightened to a specific torque of: 27Nm / 20 ft lb.
Step 10
Once tightened to the specific torque, turn the steering wheel back to being straight. Or turn it completely the other way to start the process for the other side.Once both sides have been completed, replace the road-wheels and remove the axle stands. Also replace the cap to the brake fluid master cylinder reservoir by doing the reverse of step 1. Finally, carefully lower the car back down to the ground and remove the chocks behind the rear road-wheels.

3 Comments
Hi useful but no mention of the use brake grease or what to do if the pads are stuck in!
ReplyDeleteHi Jeremy, thanks for the feedback. I will look into the absolute best practice for the things you mentioned and then update the guide :)
ReplyDeleteGood write. Nice and clear. Thanks
ReplyDeletePost a Comment
Let me know what you think by leaving a comment below.